Reflective Summary

The EP has been a success in regards to showcasing my skills as a performer and a producer, because of how varied each of the different songs featured on the EP are. These include a background-music song, a lounge music-inspired song, a grunge song, a jazz song, and a heavier garage rock/metal-like song, all of which feel different and sound relatively different too, even though the bass guitars are the main focal point of each one. The different uses of the bass guitar included melodies, solos and riffs, which managed to help make each song unique and interesting, allowing them to stand out in their own particular way (or, in the case of the first track, allow it to blend into the background perfectly, which was what I was aiming for with that particular song). It is safe to say that the EP, especially when planning the bass recordings and even after those had come and gone, needed a lot of time to gather steam and become a fully fledged idea, but the time was managed fairly well, which allowed me to complete all the stages at the correct time.

I believe I was able to manage my time effectively throughout the entire process in order to create this EP, especially since there was a limited time frame I had to record the bass guitar parts. I lived in Lincoln for a brief period of time after university was over, before I had to head home for the summer, and as such, I only had a few weeks to plan what I needed to do and record some bass lines in the university studio. While, yes, I managed to finish my recordings on the day before I had to go home, I did manage to book and record all 5 of my bass lines as well as extra parts for 4 out of the 5 songs. I say this because the first song on my EP – which was also the first song I recorded the bass guitar for – did not need any extra bass parts in my opinion, as it would add another instrumental ‘layer’, per say, which could have possibly taken away from the feeling I had intended for that song.

Working on this EP has allowed me to understand my strengths and weaknesses, and if I were to create another EP of a similar length, then I know what areas of the process I would change to further improve my production skills. Upon reflection, I understand that my time in the studio, while I used it efficiently and effectively, was also much shorter than expected due to the limited time-frame which I had to record the bass guitar sounds. If I had had more time, then it would’ve allowed me to use the full method of recording bass guitar (both using the DI Box and the amp+microphone combination for a larger variety of sounds) to give me a larger variety of sounds to choose from for the production and editing stages, even if I had opted never to use the sounds recorded from the amp in favour of the raw sounds recorded through the DI Box.

Balancing the workload was one of the other challenges I faced during this task, since I was much more comfortable with the practical bits of the task (the songwriting, recording, editing, mixing & mastering aspects) while the research and blog-writing parts were much tougher to do, simply because I didn’t enjoy those as much. I absolutely loved making the music overall though, because I thoroughly liked the editing, mixing and mastering processes, as well as wanting to practice recording my bass guitar on my own. These were the fun parts of the project because it allowed me to put my practical skills to the test, which is something I love doing, and record/produce songs that I would’ve only dreamed about making prior to coming to university.

In addition to this, I now understand how best to approach a project in regards to the research process. The research I conducted allowed me to discuss further details about different aspects of my inspirations, explain more of the technical details during the different stages of creating the EP, and define musical terms in a way that was easily understandable for those without a musical background. Being able to talk about the various songs I used as inspiration, such as Smells Like Teen SpiritSmoke on the Water,  Your Love is a Fine Thing and the lift music which inspired the first song, was a good way to compare the songs I made to those professionally made products, explaining why I chose them for inspiration and the sound or feeling I intended to create.

Looking back over the task I set myself, I can say that I am proud with the work I have done for this project. I feel that I have made an EP I am genuinely happy with, and I am confident that I can add these pieces of music to my portfolio to demonstrate my sequencing, editing, mixing and mastering skills on ProTools, as well as my general bass guitar playing too. I believe this to be the case because I have managed to not only create an EP with 5 tracks that mainly feature the bass guitar with accompanying sequenced elements, but I also backed up my creative decisions with research, clearly showed my inspirations for the relevant tracks, and managed my time effectively to best produce the EP.

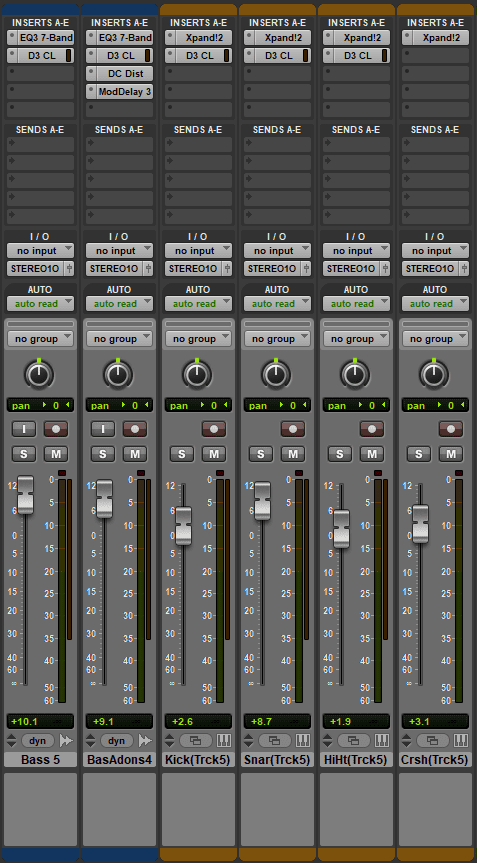
Mixing/Mastering – Song 5

Track 5 – Volumes, Panning and Plugins

Song 5 was another muddy rock/metal song that I really wanted to mix and master well, in order to produce a song that was not only thorough in its use of plugins in the mastering stage, but also rough and loud, producing an in-your-face kind of feeling that was unique to this song. To do that, I raised the volume of every single track without the tracks peaking into the red, as I knew that I needed about “6dB of headroom right across the board” (according to soundonsound.com) so I could have some extra volume free for after I added the EQ, compression, distortion and delay. This way I was able to not only make the bass guitar parts a priority in this song according to my original aims, but it allowed the drums to become more than just keeping rhythm. Thanks to the volume boosting in the mixing process, the drums became an even more integral part of the song, being not only there to keep rhythm but also to provide the track with life, thanks to the variety of uses of the hi-hat, crash cymbal, kick and snare within the track.

The drum sections, except for the crash, all got compressors which suited the style of the song. The compressor on the kick trimmed off the louder and higher frequencies, producing a rougher, muddier kind of kick which was perfect for the song. The same could also be said for the snare, which also had the louder and higher frequencies reduced, giving it less of a defined hit but just enough so it could still be heard. The hi-hat benefited as it was a rather quiet sound in general, and the compressor placed on that allowed it to be made louder thanks to the reduction in the dynamic range, bringing more of a metallic sound to the drum kit (which was perfect as it added to the already metallic-sounding kick and snare). The mastering on the drums was absolutely what I wanted to make because of the fact it sounded so rough and imperfect. In my mind, it sounded like the drum kit tracks had been recorded in a garage one day, and the slightly metallic sounds produced from that suited the songs overall feel perfectly.

When it came to the bass parts, the usage of the EQ and compressors was almost identical to the mastering on Songs 3 and 4 simply because it made the lower frequencies much louder thanks to the reduction in the EQ as well as raising the mid-to-high frequencies, which then made a bigger change when the compressor was applied. The bass guitar that was not distorted needed to be kept relatively crisp so it could support the lead, and the constant hum of that bass helped the track to feel more muddy than usual, thanks to the constant invasion of sound at that frequency. This was an intended effect because, as described with the drums, I wanted the song to sound like a muddy and rough rock/metal song written in a garage or a shed, as well as have that in-your-face feeling which none of the other songs had.

Meanwhile, the lead bass also included a distortion plugin and a delay plugin to push that feeling even further. The distortion, similar to Songs 3 and 4, gave the lead bass guitar a fuzzy lead guitar-like sound, while the delay was there to add more noise to the track through its echo-like quality. I chose to use these plugins in this way because I felt that making a ‘wetter’ sound (where you could hear the effects of reverb/delay plugins clearly, as compared to a ‘dry’ sound, where there are no audible effects) would produce more noise, which would not only make the song sound muddier, but also mean that there would be more sounds to listen to, thus enhancing the in-your-face feeling I desired to create in the song.

The song, prior to the mixing/mastering stage, sounded like this:

The final song now sounds like this:

Mixing/Mastering – Song 4

Track 4 – Volumes, Panning and Plugins

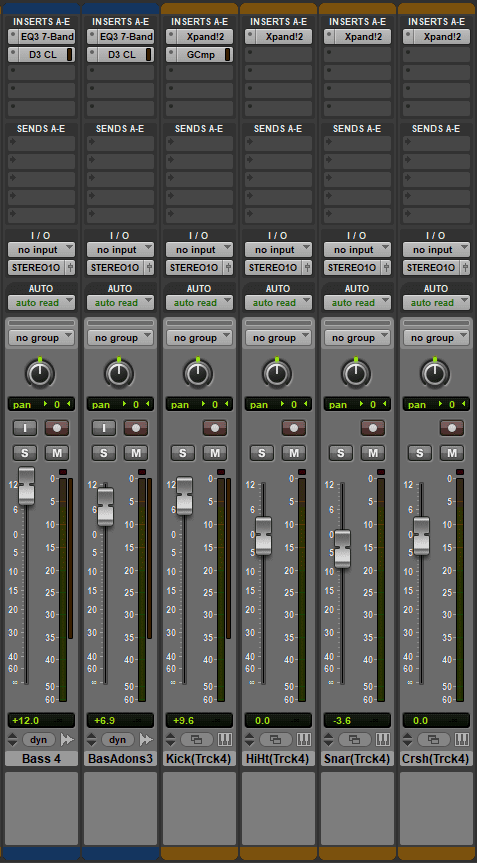
Song 4, similarly to Song 1, was relatively brief when it came to the mixing and mastering processes. I used the frequently used method of boosting the bass guitar tracks, but this time I also boosted the kick drum a lot while reducing the snare slightly. While I wanted the bass guitar to be the focal point for the song thanks to its melody, the kick drum needed to be heard to help keep the rhythm (it was a lot softer than usual thanks to the reduced velocity on the sequenced notes, which was also why I raised the volume on the kick so much). The snare, on the other hand, was too loud for my liking, and a reduction in the volume helped to make the song sound less harsh.

The mastering process was quite short as I only really needed to put a compressor on the kick drum, and an EQ and a compressor on the bass tracks. The kick drum used the compressor to gain a bit more of a thump from the lower frequencies, which also reduced the higher frequencies and made it sound less harsh to listen to, which was the effect I had intended for this song.

The bass guitars used the same EQ and compressor modifications because it allowed the tracks to produce a nice warm sound (quite loud in the lower frequencies without being too loud in the higher ones, producing a sound that is quite comfortable to listen to), which was exactly the kind of sound I wanted for the song. This was produced by using the same method I used on Song 3 – I reduced the lower frequencies and raised the higher ones in the EQ, which made the lower frequencies sound louder and reduced the higher frequencies when the compression was applied. I wanted to make this sort of sound because I wanted the song itself to be quite calming and comfortable to listen to, which is the embodiment of what a warm sound is, and I believe it worked really well.

The song, prior to the mixing/mastering stage, sounded like this:

The final song now sounds like this:

Mixing/Mastering – Song 3

Track 3 – Volumes, Panning and Plugins

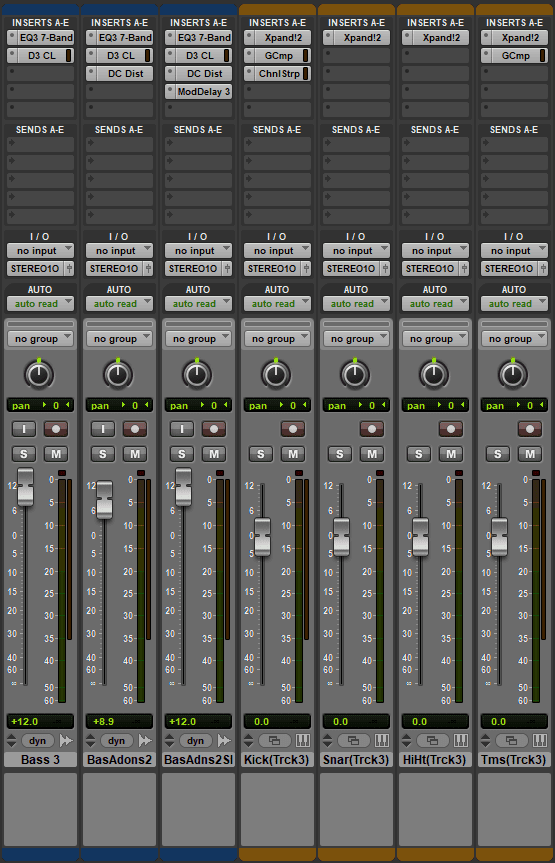
This song was both easy to mix and quite complicated to master, which made the song sound better when it was finished. In regards to the mixing part, the 3 bass guitar tracks were all raised in volume, similar to the last 2 songs, in order to keep emphasis on them while the drum maintained rhythm behind it.

All three of the bass guitar tracks (the main bass track, the add-on track, and the add-on track for the solo part) included the same EQ and compressor changes, while the two bass add-on tracks included distortion and the solo add-on track included a delay plugin. In regards to the EQ, I chose to lower the frequencies at around 50 Hz, with slight raises at around 1 kHz and 3.50 kHz to help make the bass sound cleaner and crisper, and the compression reduced the dynamic range, increasing the overall volume of the bass. This may sound counter-intuitive, as reducing the dynamic frequency between the higher and lower frequencies makes the lower ones sound just as loud as the higher ones, but this worked really well for the main bass guitar track because it helped to keep it crisp and clear while maintaining its deeper tone, producing a professional-sounding bass guitar sound.

For the add-on tracks, the distortion was used in a similar manner to how it was used on the second song. In this case, I chose to use the distortion to increase the treble (higher frequencies) while keeping the lower bass frequencies low, creating a distorted guitar-like sound that was not as muddy as the sound on the second song. I chose to create it this way because the song was a more of a jazz-rock song, and a muddy sounding guitar track would have not fitted the mood of the song at all. This way, I was able to create a lead guitar section from a bass guitar recording that could play the melody and the solo without hindering the bass guitar riffs.

The solo track was the only track to use delay in this song, which was more of a personal artistic choice. The delay plugin, as the name suggests, takes a sound which can be played back at a later time, and the effect it has is similar to an echo that fades out over time. In this case, the effect was a decaying echo that played back the sound every bar, adding a bit of noise to the solo and helping it to stand out. I wanted this effect on the solo track because it added a bit more flavour to the song, helping to keep it interesting as it flowed through the solo.

The drums also got some attention in the mastering stage too, with the kick drum getting a compressor to give it a bit of thump, while the toms needed one too in order to make the strikes sound louder, thanks to the boosting of the bass frequencies. In addition, the kick drum also received some EQ modifications, raising the frequencies around 5 kHz which, when coupled with the compressor, helped to give the kick drum the thump I was looking for. These edits for the kick drum and toms worked well because it added more variety in the frequency range, covering a wider range of frequency which helped the song sound fresh, smooth and exciting, like a jazz-rock song should be.

The song, prior to the mixing/mastering stage, sounded like this:

The final song now sounds like this:

Mixing/Mastering – Song 2

Track 2 – Volumes, Panning and Plugins

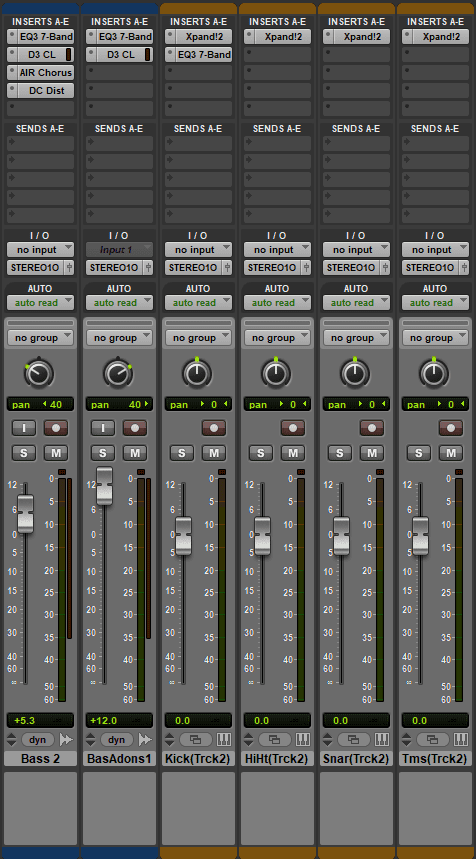
Much like the first song, the mixing in this one was quite easy to do. I chose to pan the lead bass guitar (the distorted one) to the left with the supporting bass guitar panning to the right to help the listener to hear the two tracks, and because otherwise the cleaner, crisper bass guitar track would have been lost in the mix. This way, I was able to do the mixing and mastering needed to produce a properly grunge-like song.

With the grunge theme for the song, it was only obvious to raise the volumes for the bass guitar parts higher than the drums (which I kept at the default volume level) because they would take the majority of the attention with their melodies, riffs and solos, while the drums were simply there to keep rhythm. This change of volume was also done because the bass guitar tracks were recorded rather quietly and needed that boost in volume to be relatively close in volume to the drums (This was also improved upon further in the mastering stage).

The majority of the mastering was focused on the two bass guitar tracks. The main bass guitar track (Bass 2 on the image above) actually started with an equalizer plugin that reduced the 0-100 Hz frequencies, raising the middle frequencies at 1000 Hz and even lifting the frequencies slightly at around 3 kHz. After the EQ, I applied a compressor to reduce the dynamic range between the higher and lower frequencies, and then boosted the gain (input volume) on the compressor plugin to help make the overall sound louder. This was then followed by the AIR Chorus plugin, which took the sound and applied the chorus effect to it. The chorus effect (as described here) is where sounds of similar pitches and volume play at approximately the same time and sound like one sound, and the plugin also allows for many frequencies and sounds to be played at once without boosting the volume of the track. After this, I applied a DC Distortion plugin, which took the sound and amplified it to give it the fuzzy grunge-y guitar sound I hoped for. These changes were done because I aimed at creating a more guitar-like sound which could be suitable for playing riffs as well as a solo. While it would have been easier to just use a guitar and get the sound I wanted, it would not have been meeting my original aim because I wanted each song to have a focus on the bass guitar, and bringing in a guitar would have ruined that.

In regards to the second bass guitar track (Bass Addons 1 on the image), I did the same thing with the EQ and the compressor as I did with the first, producing a much cleaner and crisper bass guitar sound to accompany the fuzzy lead, thus giving the illusion of a guitar and bass guitar combo in the process. I knew this would help immensely because the distorted lead bass guitar was so muddy that, if it was on its own or if the supporting bass was too quiet, it would have not had a supporting riff to help it while it did the solo part, thus making the song feel weaker as a result. With the help of a clean bass guitar playing the riffs on the verses and solo, as well as the chords on the chorus, it helped the song feel a bit more full and covered a larger part of the dynamic range, making the song sound a bit more pleasant to listen to.

The song, prior to the mixing/mastering stage, sounded like this:

The final song now sounds like this:

Mixing/Mastering – Song 1

Track 1 – Volumes, Panning and Plugins

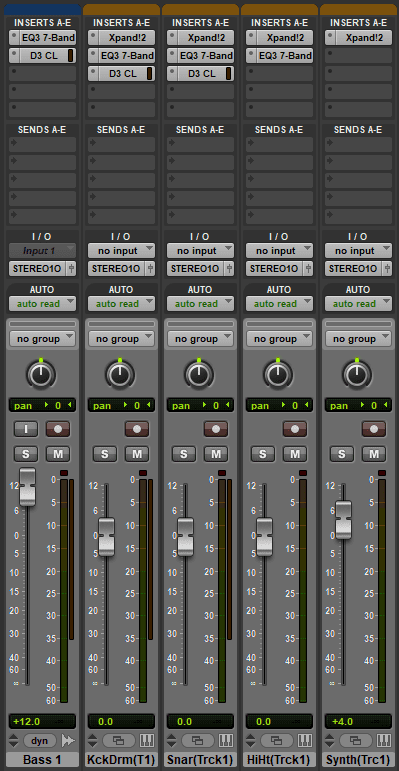
The mixing for the first song was very simple, much like the song itself. I boosted the overall volume for the bass guitar and the synth in order to make those the focal point of the track, pushing the bassy and synthesized riffs over the drums while maintaining a decent volume level for the drum kit, so as not to lose it in the mix. I opted not to use any panning in the songs because I felt like moving any of the instruments to the left or right speaker/headphone was not completely necessary, and would not have made the track feel any different or improve it in any way. Most of the improvements came through the mastering process.

When it came to mastering the track, I felt it was important to compress the bass guitar, kick and snare, and apply an Equalizer (EQ) on the drum kit tracks to get the correct sound. For the bass guitar, I applied quite a hard compression limit, which boosted the lower frequencies while simultaneously reducing the dynamic range between the lower and higher frequencies, essentially making the sounds with lower pitches match the volume of the sounds with higher pitches. As a result, the bass guitar’s volume increased thanks to this compression, which is good as I wanted a nice, clear sound for my bass guitar to lead the way through the song.

I also applied compressors to the kick and snare drum, although the compression on those were much lighter. The one I placed on the kick drum allowed it to sound a little deeper, giving it a bit of a thump-y sound which suited the song and made the kick audible without being too loud, while the snare had a very light reduction to its dynamic range, which subtly reduced the volume of the strikes due to the slight reduction in the higher frequencies volume. Both of these were changes that I felt were necessary for the song, because the kick needed a bit more ‘kick’ to it while the snare needed that slight dynamic range reduction in the higher frequencies to help emphasize its strikes a little more and sound a bit more like a realistic snare.

In addition to the compressors, I also used an EQ plugin to reduce the middle frequencies (250-300 Hertz) on both the drum and snare tracks. The kick drum needed this because the frequencies at that point only hindered the sound I wanted to create by making it sound less clear, or muddier, to use a music term. The snare needed it for the same reason: those frequencies only made the snare sound much deeper than it needed to be, and with the reduction in those frequencies, the snare sounded neat and clean, with the strikes being crisp and clear to hear in the mix.

Lastly, the Hi-Hat only needed an EQ to raise the volume of the higher frequencies, at around 5.50 Kilohertz (5050 Hertz). I could have just boosted the volume of the track in general, but that would have raised the volume of every single frequency on that particular track, which would have been detrimental to the overall feel of the hi-hat compared to the other instruments and the rest of the drum kit. This way, I was able to raise the frequency needed, making only the sounds at that frequency louder on the hi-hat track, which kept it from being buried in the mix.

The song, prior to the mixing/mastering stage, sounded like this:

The final song now sounds like this:

Track 5 – Sequencing the Electronic Instruments

Track 5

The final track was recorded at 140bpm, it has a style which was inspired by a garage rock song: Your Love is a Fine Thing by Reigning Sound. This is a rough-sounding, fast paced garage rock song, the use of the snare on the drum kit and the ‘rough’, distorted sound being the inspirations to create the last track on my EP. In regards to the sequencing, it was the usage of the drums with the kick drum and snare being used together to enhance the beats that inspired me, which I then used on every 4th bar on each verse in conjunction with the two higher pitched notes played by the bass guitar lines. I did this because I felt that it would help the track to sound heavier, thanks to the fact that the distortion on both bass guitar tracks made the song very muddy (not a lot of clarity, rather mushy, and quite perfect for a rough garage rock song) which brought the drums forward in the mix a little bit while still keeping the focus on the bass guitars. I also used a ride cymbal sound during the middle and ending sections to maintain the same rhythm as the original kick drum (a ‘4 on the floor’ pattern) while the kick drum sped up to play two sounds for every one ride cymbal sound. This was done to make the particular sections sound faster and more exciting, to make up for the fact that the bass guitars were pretty much playing one note over and over again at around the same pace, essentially trying to keep the drums and bass guitars in sync with each other to maintain the songs structure.

Track 5 – The velocities of the Sequenced Sounds

The velocity varies depending on the 2 different sections included in the song. The hi-hat, which has the most notes sequenced out of all of the sounds in the drum kit, has the largest variety of velocities ranging from 100% down to 50%, either being really harsh on beat or having softer off-beat hits, allowing the listener to identify the emphasis of each strike on the hi-hat. The snare also includes some variety, so most of the strikes on the snare sounded slightly quieter than others. These changes to velocity were done to give some life to the track, because, as was the case with all the previous songs, I wanted to make sure the drum kit did not sound robotic and lifeless due to a lack of variety in how loud or hard the drums were played, giving them an almost human-like quality.

Track 4 – Sequencing the Electronic Instruments

Track 4

Track number 4 was the slowest song of the EP at 115 bpm. It was a lot softer compared to all of the other songs too, not having anything fancy with the playing or sequencing but still relatively melodic and varied enough to be enjoyable to listen to. Similar to the first track, this song was designed to help be a background track, although this track in particular was designed to be an instrumental piece of Lounge Music.

Lounge music was popular in the 1950’s and 60’s and designed to help the listeners feel like they are somewhere relaxing, such as “laying by the pool, chilling to music with a glass of your favorite chardonnay, or simply relaxing in the spring sun with your favorite book.“. One such example of the feeling I wanted to try and create with my music was a video I discovered while browsing YouTube which formed the basis of my inspiration for the song. This song was jazzy in nature, which, if I had tried to recreate that, would have made this track into the second jazz-like song in a row in the EP. I felt that doing a second jazz piece was going to be too much for this EP, because, while I appreciated the video for the relaxing vibes it had, I wanted to have a bit of variety in the songs I created. Plus, I really liked Track 3, and I did not want to accidentally make something that sounded the exact same as that and possibly ruin both tracks.

So, my sequencing choices mainly included removing most of the swing from my inspiration, and, using the synths I chose in ProTools, I chose to stick with a very simple beat with the kick, snare and hi-hat accompanying the two bass lines (the reason for this being that it is harder to relax with a hard, fast, or complex beat with anything more than that) with one crash cymbal right at the end of the song. The drums, once again, were kept behind the bass guitars because they were more melodic despite their repetitive-ness, and I wanted those to be the focal point of the song, aided in part by the kick or snare striking in time with some of the bass parts, especially when it came to the choruses and the bass solo.

Track 4 – The velocities of the Sequenced Sounds

In terms of velocity, some variety was used for the kick drum around the start of the song and at the chorus sections. This was done in order to diversify the intensities and rhythms of the different sounds, which helped to signify the change between the verses and choruses. The snare, on the other hand, had a much bigger variety of changes, primarily making the snare softer due to the lounge-like nature of the song. Otherwise, though, all of the drum tracks were kept quite soft until the big finish at the end, where the snare built up to a rather loud crash cymbal at the end, purely to add a nice, big finish to the song.


Track 3 – Sequencing the Electronic Instruments

Track 3

We move on to the 3rd track, which is the fastest song at 144bpm and a more jazz-rock kind of tune. You can hear from the starting riff that the notes are similar to the starting riff in Smoke on the Water by Deep Purple, which was a bizarre source of inspiration as the song itself was not at all jazzy. However, it was only the notes on the riff that really inspired me, as I really enjoyed how it sounded and I wanted to recreate it in a more jazz-like setting, which led to the creation of my third song.

The song sounded a bit more upbeat compared to the others, thanks to the jazz ride cymbal pattern (which I found on the hi-hat sound selection on the XPand!2 plugin – hence why that ProTools track in particular is called ‘HiHat’) on the drums which gives the song a sense of ‘swing’ (http://www.paulwertico.com/articles/jazzridecymbal1.php). Sequencing the ride cymbal to create this sense of swing was quite simple, especially thanks to this diagram (which I found on the website previously linked, which is an article that talks about the jazz ride cymbal pattern on Paul Wertico (a drummer from Chicago, Illinois, that won seven Grammy Awards for his drumming)s blog) that explained the pattern. Basically, I had to design the ride by applying the notes onto the appropriate ProTools track, keeping to the rhythm on the diagram but making sure it was still suitable for the songs tempo, and when compared the bass guitars rhythm.

I opted to remove the ride completely from the solo section so the bass could be clearly heard, also including a simple ‘4 on the floor’ pattern for the kick drum with a snare on every second beat. For the 7th and 8th bars, the kick drum would do a similar pattern to the ride with increasing velocity, followed by a hit on the toms, and the pattern would repeat again. This was a really effective drum line to use because it had enough swing to keep the song interesting, some variety to spice things up a little, as well as keep the structure of the song intact while the bass guitars played their parts throughout.

Track 3 – The velocities of the Sequenced Sounds

The velocities had a few constant parts with some minor changes between the verses, choruses and the solo too. As the image above shows, the hi-hat/ride had the most usage of this feature in order to demonstrate the emphasis of the first strike of the ride cymbal, followed by 2 quieter strikes in the jazz pattern. There are 2 parts where they fade in alongside the kick, which is at the beginning of the song and just after the solo to help build the song back up after the quieter parts. Both of these were used to add some variety to the drums, and, similarly with previous tracks, was intended to help the drums become more lifelike instead of just being sequenced into the tracks in a robotic manner.


Track 2 – Sequencing the Electronic Instruments

Track 2

Before we look at the second song, listen to the beginning of the song that inspired it.

Nirvana’s song Smells Like Teen Spirit, which was released in 1991, uses repetitive, distorted guitar/bass guitar riffs as well as rhythmic drum sounds to accompany the singer (Kurt Cobain). The bass guitar varies slightly from verse to chorus, but otherwise remain constantly playing the same riff throughout the song, while the drums change a lot more between the chorus and verse, becoming less intense for the quieter verses, only to come crashing back to life for the loud choruses. The drums, however, were not the inspiration for this track, as I was more interested in the distorted guitar sounds and the repetitive melody.

It was my intention for this 120bpm track to take some if its inspiration from Smells Like Teen Spirit (which is mainly used in the beginning bass part, leading into a heavier, distorted bass guitar line on my song), wanting a grunge-y feel to the majority of the song. To this effect, I designed the drums (which consisted of a kick, hi-hat, snare, crash and toms) to be a simple repetitive rhythm, not too far back in the mix since I did not want it to be buried underneath the bass guitars, but not as loud as the bass parts to keep the focus on them. The reason I kept it simple was because the melody and solo parts were being performed by the bass guitars, both of which were the focal points of the song, and the drums were pretty much only there to help keep the rhythm while the bass guitars did their thing. Similar to the drums in Nirvana’s song, the drums in this track were designed in time with the bass riff, working with it to hold the structure of the song together, especially during the choruses, with enough variety in the velocity on the hi-hats to help make the drums sound less robotic.

Track 2 – The velocities of the Sequenced Sounds

Unlike all of the other tracks in the EP, this one does not include much in terms of velocity changes, so there is not much to talk about here. It is all increased to the maximum so the drum sounds are the loudest and harshest they can be, which seemed to fit in well with the grunge-like feel of the song due to how loud it was.